Text Effects in Photoshop CS3
3 posters
Page 1 of 1
 Text Effects in Photoshop CS3
Hello Users ,
Welcome to my first tutorial ^^ today i will show you how to make a text effect like this

Before you start please get this font
You probaly dont have it because you need to download it. You can download the font here http://www.getfreefonts.info/free_font.creepygirl.html
Ok put the 3 files in your fonts folder its in this path for Windows
C:\Windows\Fonts
Extract the 3 TIFF files in there it should install them if you put them in there the you can use them
Ok now i will make the steps explaining the tutorial with pictures where you can see the settings of the style of that text its in german but still its the same postion of the sliders and stuff just copy the numbers etc.
Ok first make a new document with the preset Width 300 Pixel and Height 250 Pixel then under the height it should say 72 if it doesnt type in 72 and select on the dropmenu pixel/inch
the color mode you make to CMYK and 16 bit and press ok.
You should have this on your screen.

Ok now press STRG+I and the background color should go black.
Ok now press T you should now have the text tool .
Before you left click and type a text do this at the top there are settings for the text change the font to Creepygirl.
And put the type to regular thats the second box of the settings just right to the fonts and the font size you change to 83 pt you can change it if you want but in this tutorial i made it 83 pt.
Ok now left-click on the middle of the screen or near it and type in any text i will use TBX.
now on the right side of the photoshop interface you should see layers one is the black background and one should be a Text Layer. Right-Click on the Text Layer and click on the secone one of the top

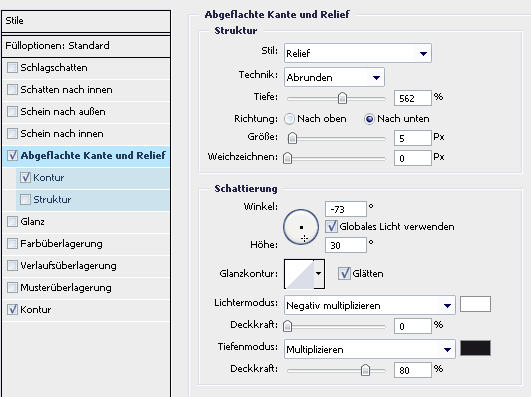
Then click on the option where the arrow is pointing in the picture

Copy all Settings you see in the Picture above
I dont know if in the english version it is diffrent called but to make sure.
Put the Stil on this one

And the Technique you put on the first one called round off or something like that.
The other settings you need just copy it what you see on the picture
Notice : the last two modes you dont need to change the are the default ones.
Copy Settings like This :

Then click on this which the arrow is pointing at and the other arrow at the top poinint the checkbox check it.

Ok now the last step is click on stroke and copy the settings of this picture below

The position is outside.
The mode is brighten color in german called hellere farbe so yeah.
You should now see this result :

I hope you liked my first tutorial and im sorry if i didnt explain everything good and hopefully it didnt distrub you that my version is german ^^.
Regards
TheBlacklightX
Welcome to my first tutorial ^^ today i will show you how to make a text effect like this

Before you start please get this font
You probaly dont have it because you need to download it. You can download the font here http://www.getfreefonts.info/free_font.creepygirl.html
Ok put the 3 files in your fonts folder its in this path for Windows
C:\Windows\Fonts
Extract the 3 TIFF files in there it should install them if you put them in there the you can use them
Ok now i will make the steps explaining the tutorial with pictures where you can see the settings of the style of that text its in german but still its the same postion of the sliders and stuff just copy the numbers etc.
Ok first make a new document with the preset Width 300 Pixel and Height 250 Pixel then under the height it should say 72 if it doesnt type in 72 and select on the dropmenu pixel/inch
the color mode you make to CMYK and 16 bit and press ok.
You should have this on your screen.

Ok now press STRG+I and the background color should go black.
Ok now press T you should now have the text tool .
Before you left click and type a text do this at the top there are settings for the text change the font to Creepygirl.
And put the type to regular thats the second box of the settings just right to the fonts and the font size you change to 83 pt you can change it if you want but in this tutorial i made it 83 pt.
Ok now left-click on the middle of the screen or near it and type in any text i will use TBX.
now on the right side of the photoshop interface you should see layers one is the black background and one should be a Text Layer. Right-Click on the Text Layer and click on the secone one of the top

Then click on the option where the arrow is pointing in the picture

Copy all Settings you see in the Picture above
I dont know if in the english version it is diffrent called but to make sure.
Put the Stil on this one

And the Technique you put on the first one called round off or something like that.
The other settings you need just copy it what you see on the picture
Notice : the last two modes you dont need to change the are the default ones.
Copy Settings like This :

Then click on this which the arrow is pointing at and the other arrow at the top poinint the checkbox check it.

Ok now the last step is click on stroke and copy the settings of this picture below

The position is outside.
The mode is brighten color in german called hellere farbe so yeah.
You should now see this result :

I hope you liked my first tutorial and im sorry if i didnt explain everything good and hopefully it didnt distrub you that my version is german ^^.
Regards
TheBlacklightX
 Re: Text Effects in Photoshop CS3
Coooooooool

EazY- Admin

- Posts : 176
Points : 223
Reputation : 21
Join date : 2010-01-12
 Re: Text Effects in Photoshop CS3
Finnaly something, we can use u for..
That was really mean of me,

That was really mean of me,


SomeLad123- Admin

- Posts : 207
Points : 241
Reputation : 8
Join date : 2010-01-24
Age : 27
Page 1 of 1
Permissions in this forum:
You cannot reply to topics in this forum
 Home
Home